Recently got hold of a Raspberry PI as I had heard a lot about this thing. The main thing I wanted to do was set it up as a media center. Now, though a lot of information is there on the net about how to do it, there was sadly a lot of information which was missing. The main aim of this blog post is to help you to get a whole setup running - because getting just the Raspberry Pi will not really work out of the box. The Pi team also assumes that you will have a lot of these things already at home - and while that is mostly correct, it does not really help in a permanent setup.
Parts List
Here are the parts you will need. Basic Assumption - you have a TV with HDMI , and you have access to a laptop/PC and access to the internet. Also you have the media on a USB drive.This is not mentioned in any one place, and it took me a while to figure out :
- The Raspberry Pi : I suggest getting the one which comes with a box cover, as here in India it is quite dusty. Also, get the Model B as it has more RAM, and extra connection ports.
- A HDMI Cable : The Raspberry Pi connects to video via a HDMI port, and although your TV will already have a HDMI cable, you would already be using it. So, order a separate cable to use with the Pi else you will keep swapping the cable between the pi and the other box you use ( in my case the TV reciever box)
- A WiFi USB dongle : I suppose there will be a day when the pi will have the wifi inbuilt into the box. But so far, it comes only with an Ethernet connectivity. Since you will normally not have an ethernet cable running all the way into your living room, you will need the WiFi connectivity. Not all USB Wifi Dongles work ! Make sure what you purchase is supported - check the list.
- A SD Card : The PI does not come with any hard drive. It uses SD cards for booting up. If you have a digital camera ( except the SONY ones), then you will already have a SD Card. You will minimally need a 4GB card - but I would suggest something bigger.
- A power source : The PI uses the same power adapter as most phones ( unless you have an iPhone). It is a micro-usb powered devices, so most android phone chargers would fit. What you want is something which can give 5V and 1.2 A . The google Nexus phone charger fits the bill perfectly. Technically, you can have a lower A ( 750 mA is the least power you need), but to power the USB ports, I would say go for something with 1.2A or else get a powered USB hub ( next point)
- A powered USB hub. Mostly the USB hubs we have are not powered. They derive the power from the PCs or laptops. But with the low power that the PI uses, if you want to get anything attached to the PI, get this. With the 1.2A adapter I have seen you can power a HDD and a wifi dongle. But nothing more.
- A Keyboard and Mouse : Well, actually the mouse is optional, as you can do most things using the keyboard. Also keyboard will be required just at the start if really needed, else most of the TVs with a CEC remote - you can control the media center through the remote.
- A SD Card reader. The way you will install the OS on the SD card is via a card reader. If you have a laptop with the built in slot - great - you can use that. Else you will need a card reader.
Cost
Here are some links to get you started off on your purchase :
- Raspberry Pi with clear case at Crazy Pi : Rs 3,490
- HDMI cables from Amazon : Rs 399
- COMCAST WiFi USB from Amazon : Rs 399
- 8 GB SD Card from Amazon : Rs 467
- Powered USB hub from Crazy Pi : Rs 750
So, that comes around 5,5k + taxes ( Amazon has taxes included in the price, but Crazy pi has additional tax and shipping fee).
Setting up the SD Card
Now that you have all the hardware, the next step is to install the OS on the SD Card. Head over to raspbian and download the installer. This is a small installer which will be used to install the entire system.
XBIAN is a media center which is linux based.
RaspBian is an XBIAN build specifically for the Raspberry Pi
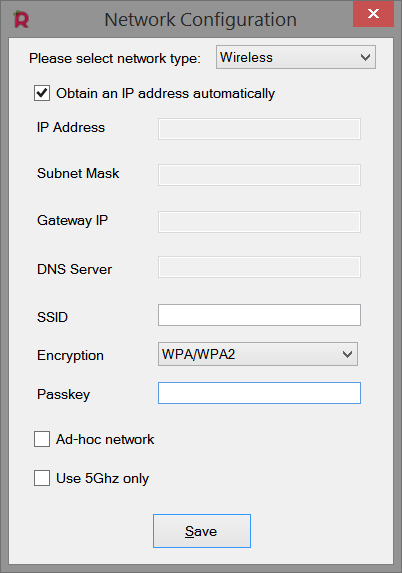
Next, connect the SD card to your laptop/PC. Follow the steps given on the installation page. In addition make sure click on the "Manually configure WiFi" which will popup a screen to enter the details of your WiFi Setup.

Enter the details and let it finish writing to the SD card.
Starting the Media Center
Now, assemble your PI by putting in the SD card, the WiFi dongle and connecting to the HDMI cable and the USB drive. Plug in the power source only after you have connected everything else.
As soon as the power is connected this will boot up and you will see onscreen details scroll by. If the WiFi has been setup correctly, you will see the update starting. Wait for it to finish ( it is about 1GB! )


